All posts by mark

Good vibrations, bad vibrations – engineering an AFM for space

An atomic force microscope (AFM) is a very sensitive instrument, often mounted in the lab on a special table which dampens vibrations. Now think of a rocket launch – about as far from “vibration free” as you can get! So designing an AFM for space was a challenge. It has to be capable of surviving the rough ride into orbit, and yet still make precision movements and measurements. In this post I’ll talk a bit about some of the measures taken in the design of MIDAS, the AFM on-board the Rosetta spacecraft, to address this issue.

Moving parts

Although space engineers typically try to avoid mechanisms and moving parts, sometimes they’re necessary. And the very nature of an AFM, which moves a sharp tip over the surface of a sample, means that we cannot avoid moving parts!

We have a coarse approach stage which moves the microscope into contact with the sample.

We have a wheel which rotates to move the sample from its exposure position, facing out to space, to its scanning position. And the wheel can also be moved sideways in front of one of the sixteen cantilevers.

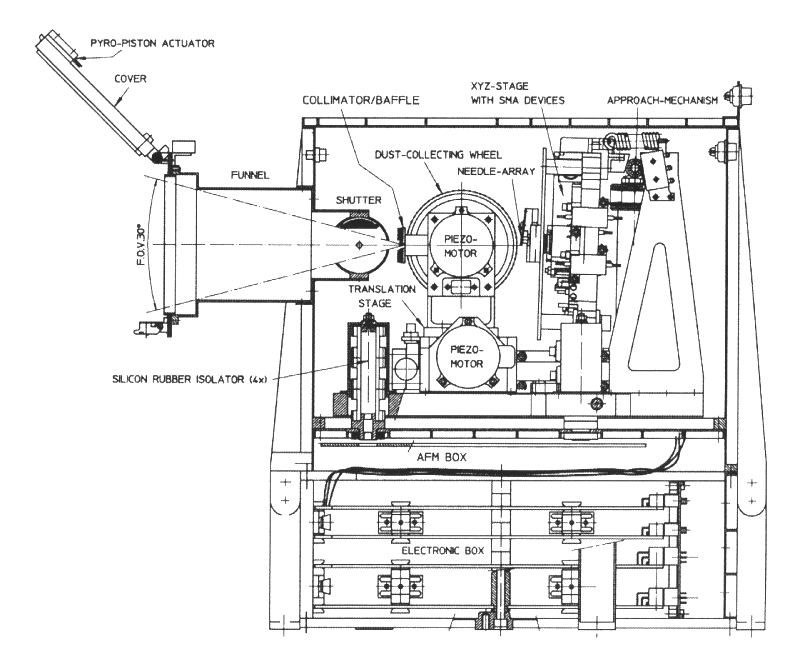
Then there is a shutter which opens and closes to control when dust is allowed into the instrument, and a “one off” cover which protected the instrument from contamination before and during launch.

Finally the actual scanning mechanism, our XYZ stage, has to move in three dimensions.

All of these mechanisms had to be designed to move on demand, and to still work after ten years in space, but at the same time survive the launch. To manage this the engineers designing MIDAS used pretty much every trick in the book, from shape memory alloys and paraffin actuators to pyrotechnic bolts and good old friction.

To give you an idea, here is a list of the key mechanisms and actuators on MIDAS, what they are for, and how they work..

Dust cover

  • Purpose: protect the instrument prior to and during launch
  • Mechanism: redundant pyrotechnic pins
  • How it works: after the holding pins are released, a pre-loaded spring opens the cover
The MIDAS funnel with the one-shot cover, in closed position

Vibration damping lock

  • Purpose: MIDAS is mounted on a vibration damping system, which was clamped for launch, and had to be released
  • Mechanism: paraffin actuator (one per pair of clamps)
  • How it works: a heater warms a small amount of paraffin wax, which thermally expands and drives a mechanism, in this case releasing the clamps.

XY table launch lock

  • Purpose: the heart of the microscope is an XYZ stage, also clamped to avoid damage during launch. Two clamps had to be released after launch
  • Mechanism: shape memory alloy
  • How it works: the shape memory is warmed by heaters, deforms, and in doing so breaks a locking pin
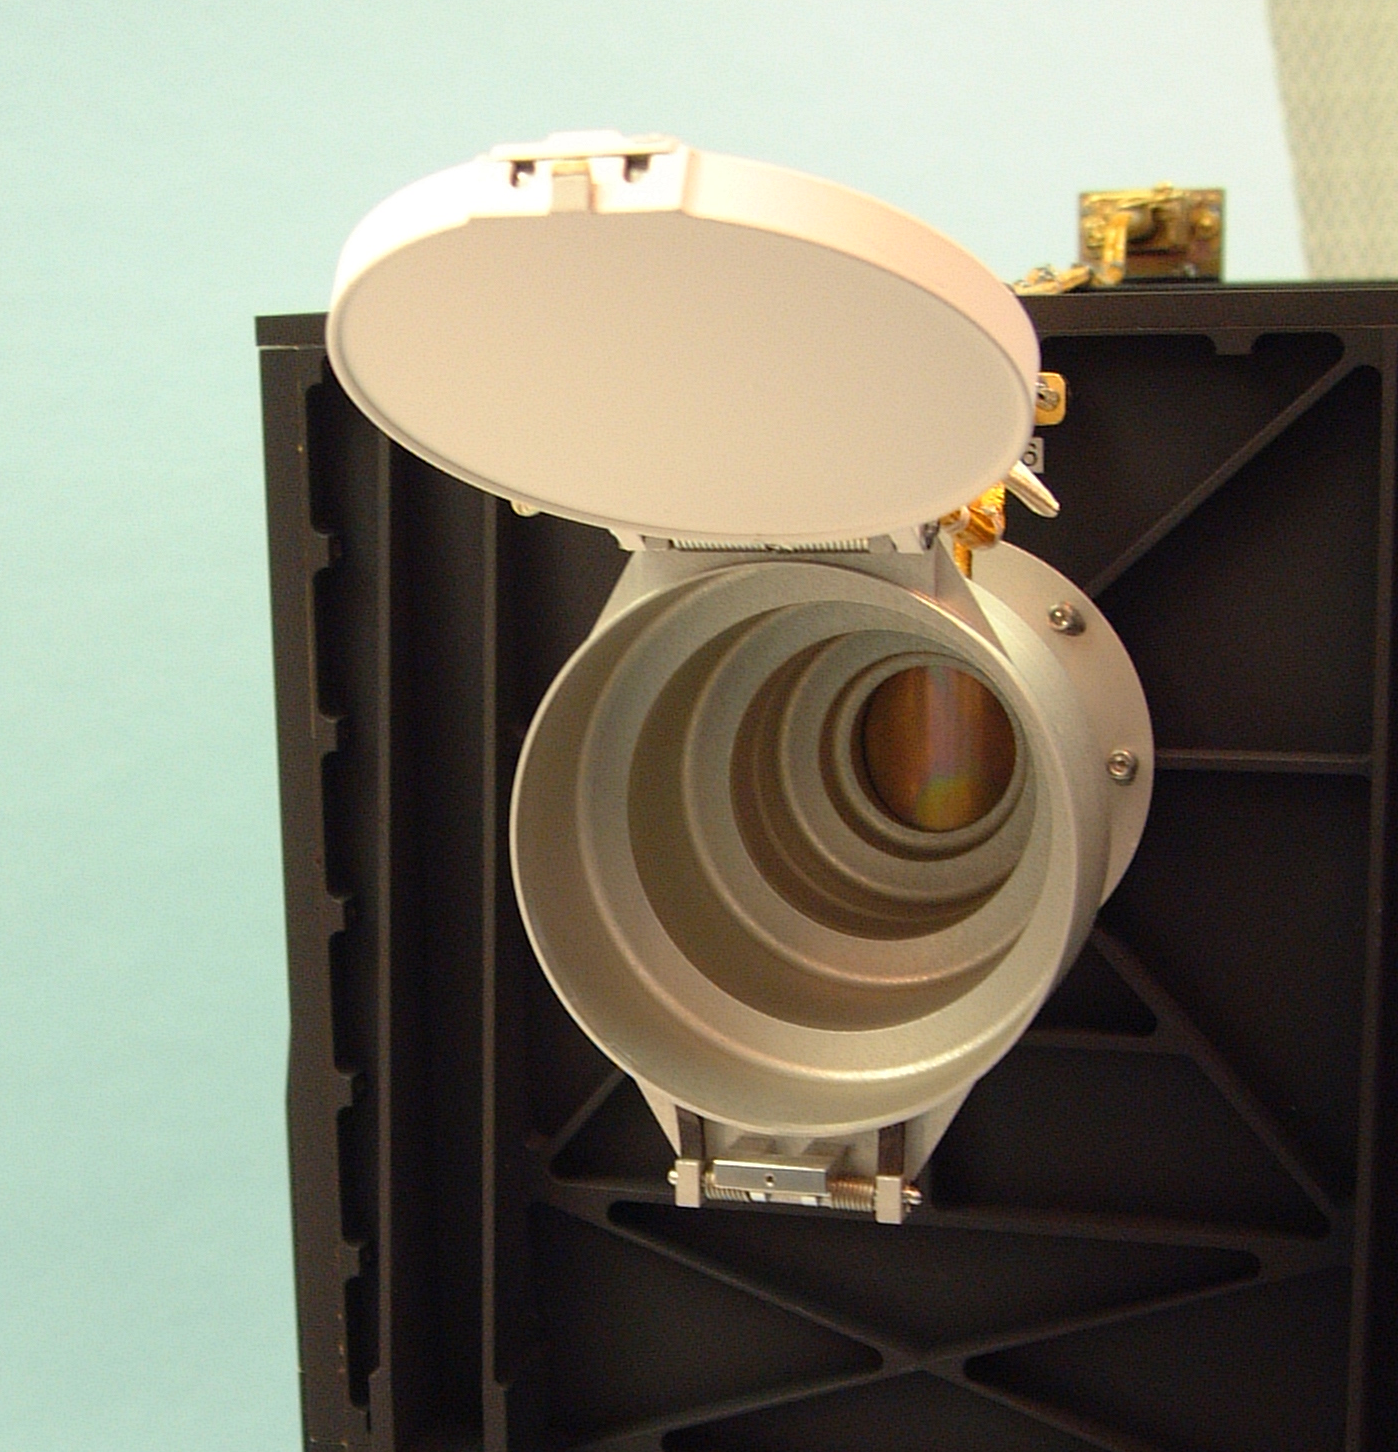
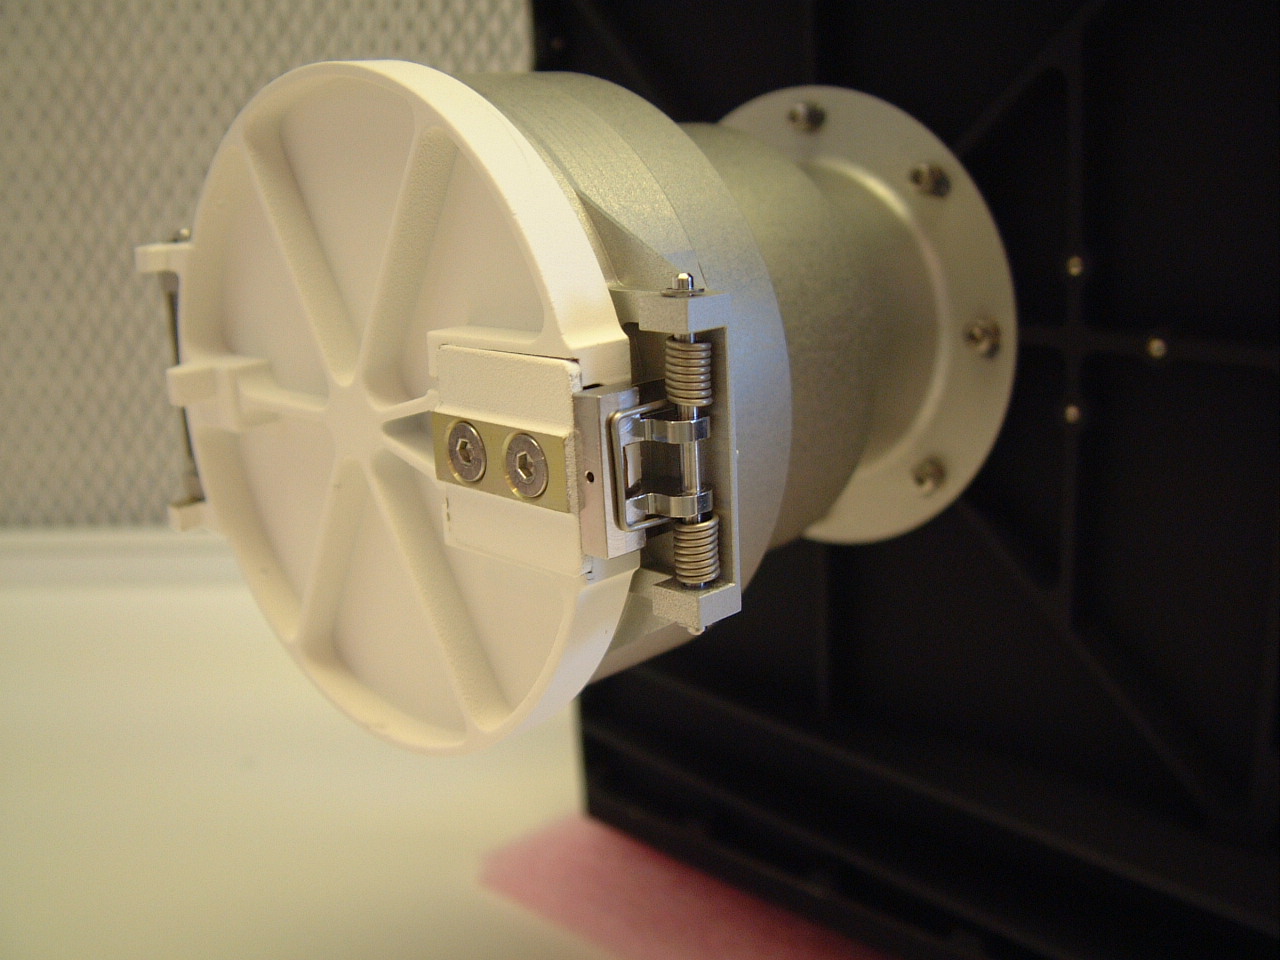
Approach stage

  • Purpose: to move the entire microscope into contact with the sample
  • Mechanism: DC motor + planetary gearbox
  • How it works: just like a motor on Earth! In this case the whole mechanism is encapsulated in a pressure vessel. The motor turns a spindle and drives a wheel between two wedges, moving the microscope to the left in the image

    The coarse approach mechanism used to move the MIDAS AFM into contact with the sample
    The coarse approach mechanism used to move the MIDAS AFM into contact with the sample

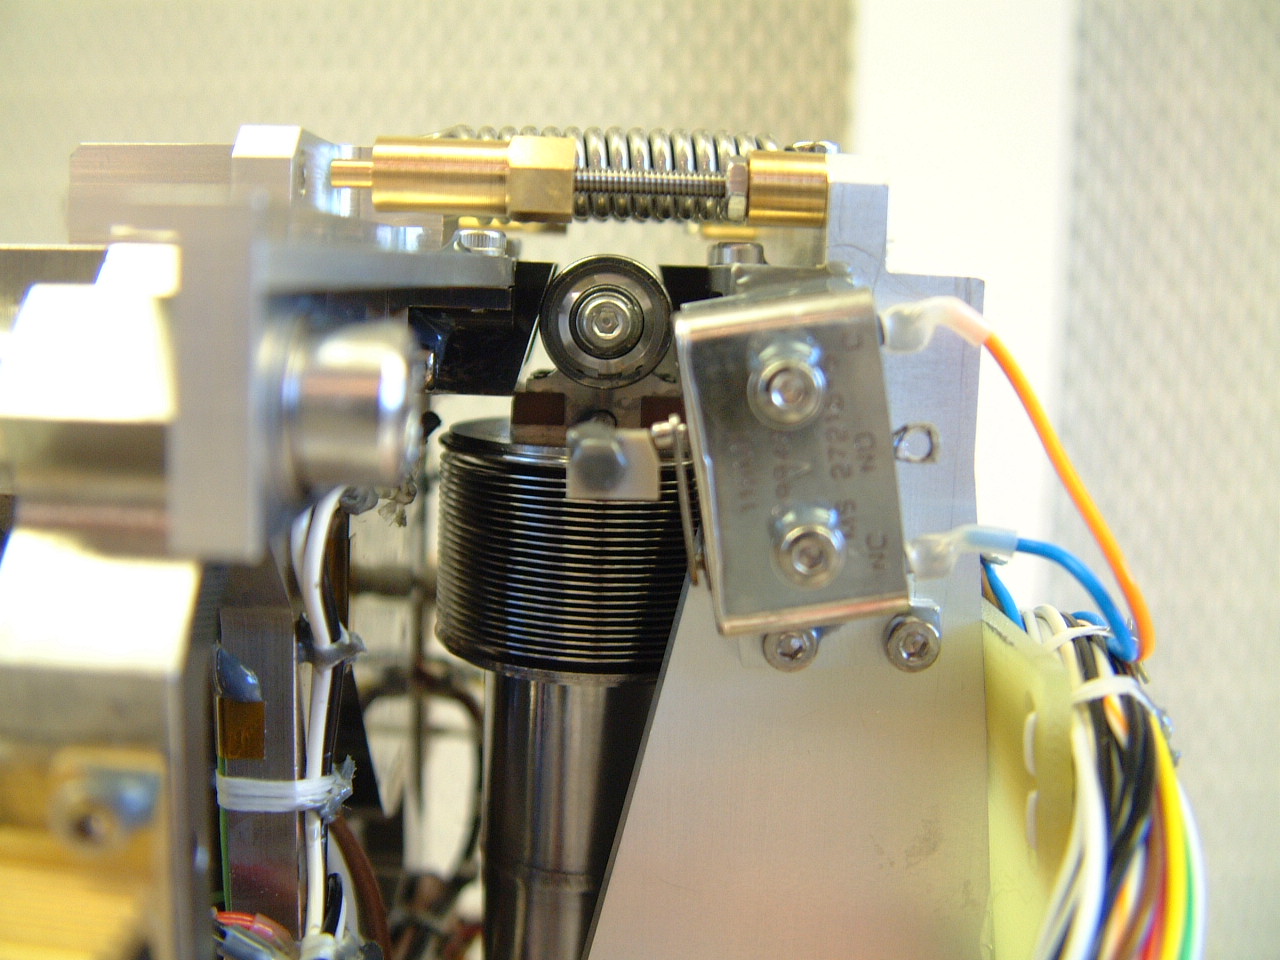
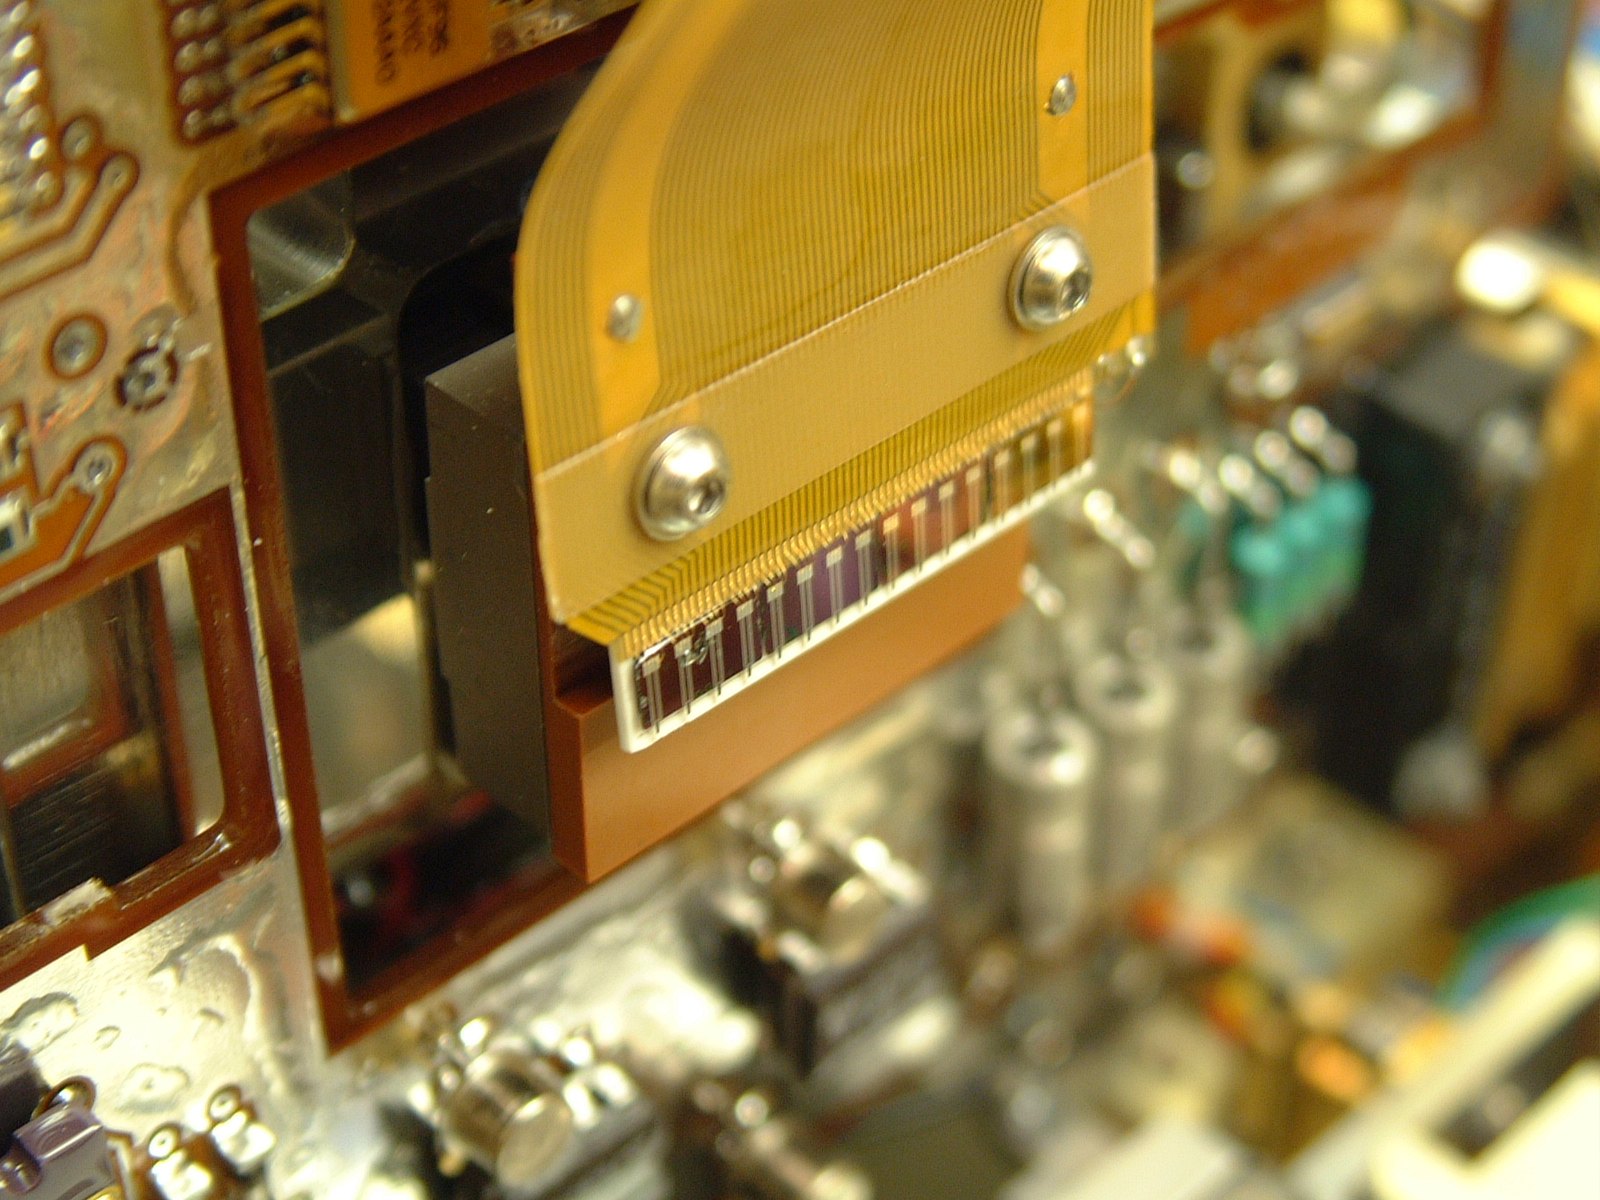
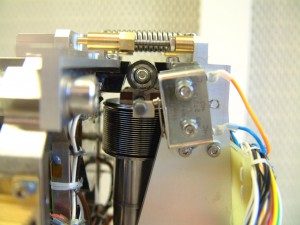
Linear stage, wheel and shutter

  • Purpose: the linear stage moves the wheel between the cantilevers and provides coarse “X” positioning
  • Purpose: the wheel rotates to  move samples from the expose to scan positions, and provides coarse “Y” positioning
  • Shutter: the shutter opens and closes to control exposure times
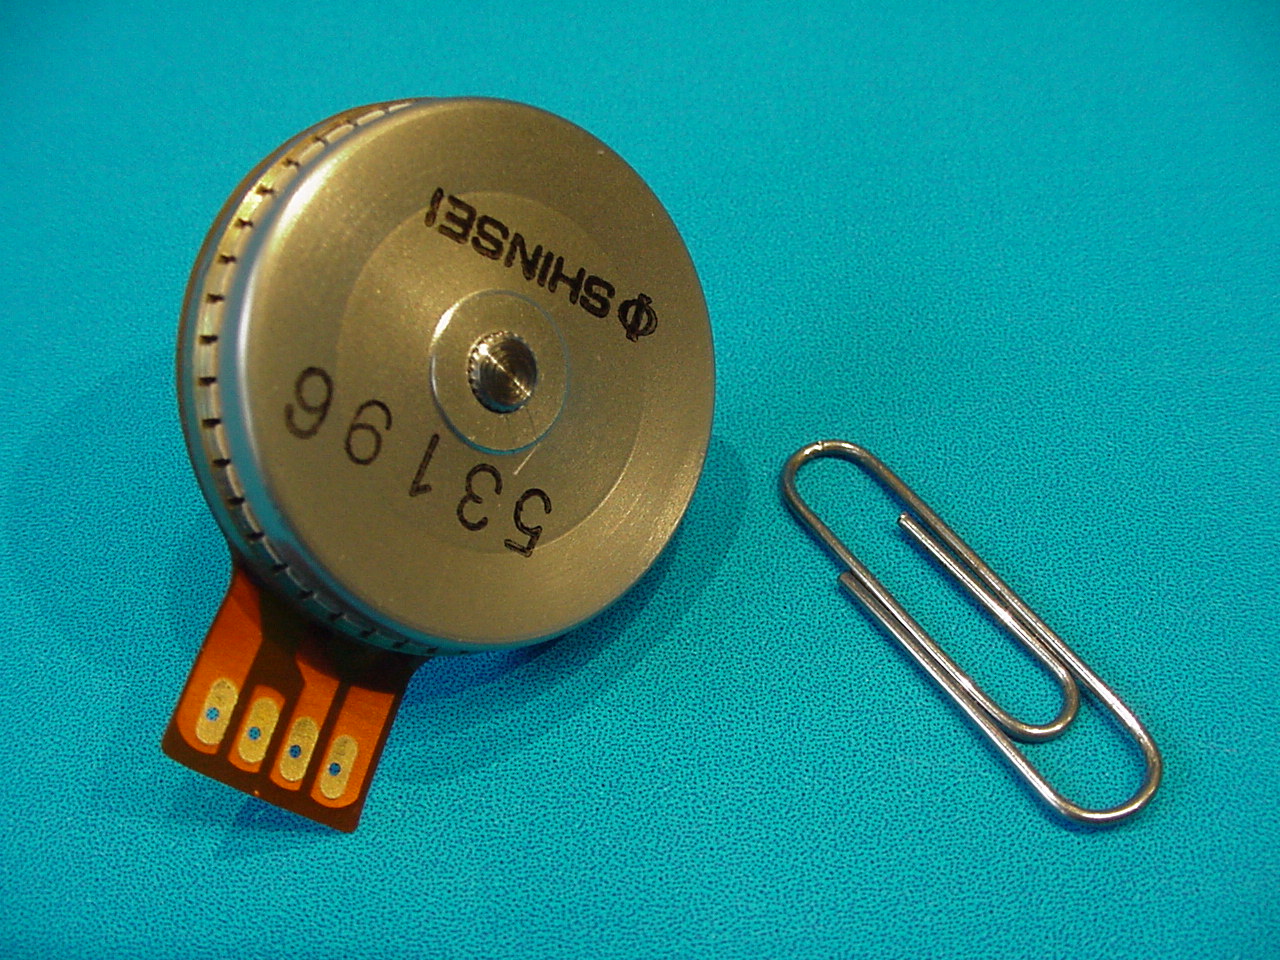
  • Mechanism: all three of these mechanisms are driven by commercial pizeo-electric motors, refitted for space use.
One of the commercial pizeo motors refitted and used in MIDAS

XYZ stage

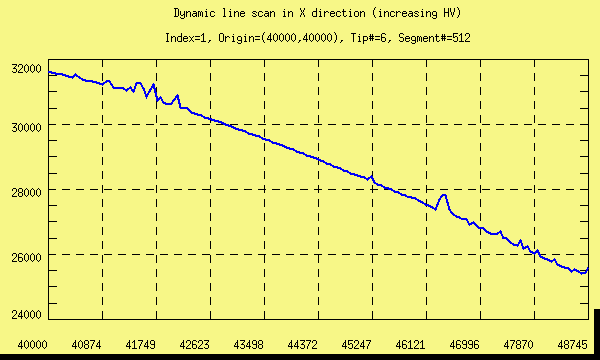
  • Purpose: the heart of the microscope is the XYZ stage which moves the cantilevers up to 100 µm in X and Y and 10 µm in Z
  • Mechanism: mechanically amplified piezo actuators
  • How it works: applying an electric field to a piezo-electric material causes it to expand – slightly! With mechanical amplification this can be used to make very precise movements.

Hopefully that gives you some idea of the immense thought and care that has to be taken to take an instrument that works on the Earth and make it survive launch, 10 years of flight, and be ready to unlock the secrets of the Solar System… watch this space! 🙂

Scanning the deep space hibernation target

Throughout the 957 hibernation period of Rosetta, MIDAS has been in its “exposure” mode, with a clean target positioned at the funnel and the shutter open – see the diagram below to get an idea of the gemoetry. Although the Solar System is full of dust, we didn’t expect to collect much, if anything; after all MIDAS has only a small opening to let dust in, and a small collector behind it. But we did it anyway. Firstly because… well, why not! With no power available to run the instruments during hibernation, at least this way there was a chance we could do some science. But also as a safety measure – if the shutter were to jam after the cold of hibernation, at least we could still operate the instrument!

MIDAS side view
MIDAS side view

In this, our third re-commissioning slot, we want to perform our first real scan since hibernation. This lets us check out the newly upgrade flight software, do a real test of the instrument, and check if perhaps we did collect some dust during hibernation. This test is partially non-interactive (the commands are stored on-board the spacecraft and sent to MIDAS at specific times) and partially interactive. In this latter part we want to test upgrades to our feature recognition algorithm. Since operations on-board Rosetta have to be planned in advance, and an atomic force microscope is usually a “hands on” instrument, we have to bridge this gap with software.

To do this we have scheduled a scan and then let the software examine the image and determine if there are any dust particles present. If so, the on-board software automatically sets up the microscope to look at the most prominent feature in a subsequent scan. In this case we decided on a 160×192 pixel image with a resolution of about 210 nm (one nanometre is one millionth of a metre!), making an image size of about 34×40 µm. The image data will be transmitted to Earth at the end of the non-interactive part of the exercise, along with the features in the image that the software has found. MIDAS will also automatically set up the next scan based on the discovered features.

The MIDAS team will be sitting at ESOC, the ESA control centre in Darmstadt, Germany, waiting for these data to be downloaded. We will then look at the image and compare the features that we would choose to zoom in on with those that the software found. If necessary we will update the coordinates for our zoom image (this is why we need the interactive part!) and upload these to MIDAS.

By the end of this exercise we will have fully tested MIDAS, but we’re not quite finished with the re-commissioning yet! To make good scientific measurements it is always necessary to calibrate equipment and the same is true for MIDAS. To make sure that our scanner (the unit that moves our sharp tips in three dimensions: X, Y and Z) measures a nanometre as a nanometre we carry several on-board calibration targets. By periodically taking images of these targets we can be sure that all of our scientific images can be labelled with real units.


Update 31/03/2014: reporting live from ESA Operations / ESOC

As well as tweeting, I figured I could add some more details more-or-less live here… The MIDAS operations that were running non-interactively completed… but not with all green lights. The commanding of MIDAS is quite complex, and it turns out I had set a parameter incorrectly (my bad!). As a result, we are changing the plan for this evening slightly from the above. Instead of commanding a follow-up zoom in the interactive slot, we will repeat the failed operations from our non-interactive slot – basically we will still image the DSH hibernation target, and still test the zoom function, but not have the chance today to follow-up “live”. That will have to wait for a later opportunity.

Now to the specifics… an AFM running in dynamic mode uses cantilever which is oscillated at close to its resonance frequency. The specific cantilever chosen for the scans tonight has the following resonance curve (taking during our first re-commissioning activity):

Cantilever resonance scan

The on-board software then knows where the peak of this curve is, and uses the frequency and amplitude of this peak to control the microscope. To find this resonance peak we command a frequency sweep, characterised by start frequency, a frequency step, and a number of scan blocks. Each block has 256 frequency steps, so with a step of 1 Hz, each block covers 256 Hz. For tonight’s scan we had a start frequency of 82210 Hz, and should have scanned over a range of 2048 Hz, with 8 blocks each with a step size of 1 Hz. This is where my entering 1, instead of 8, caused problems. Instead of scanned only from 82210 Hz + 256 Hz = 82466 Hz. As you can see from the graph above, this is nowhere close to the necessary frequency range. So when we got the data back from Rosetta, the curve looked like:

MIDAS frequency scan from the DSH commissioning slot

Not quite what we hoped for, but it’s clear why it failed! Fortunately the nature of the subsequent interactive slot means we can actively send the commands to the spacecraft and instrument straight away, and run the test again!

22:30 – now we have live telemetry from MIDAS and are much happier 🙂

Watching the telemetry roll in "live" (with a 36-minute light-time delay!) from MIDAS
Watching the telemetry roll in “live” (with a 36-minute light-time delay!) from MIDAS

And here is our first line scan! Before rastering across the surface of a sample, we did a simple linear scan to check how things worked. We also requested some diagnostic data during this scan (which we can’t  do during a full image scan because it would generate too much data)…

Our first line scan since hibernation!


Software upgrade at 655 million kilometres

Please note: this article first appeared on the ESA Rosetta Blog here

Software upgrades are something we are all too familiar with – almost every day small fixes, or patches, are ready to download to our computers, phones and tablets. Mostly these are a minor inconvenience, but sometimes something goes wrong and you’re left with a computer that won’t boot. As annoying as this is, the worst case scenario is usually a re-install of the operating system.

But what if you’re upgrading the software on an instrument flying onboard a spacecraft 655 million km from the Earth? The answer is in a careful design of the instrument followed by testing, testing and more testing on the ground!

When MIDAS is first powered up, it boots into “kernel mode” – the kernel manages a very robust set of basic operations for communicating with the spacecraft and the ground and for managing the more complex main program. From kernel mode we can upload patches to the main software, verify the current contents, or even load an entirely new version.

Although Rosetta and MIDAS spent 957 days in hibernation, the MIDAS team back on Earth were busy learning how best to use MIDAS with tests on the Flight Spare (the identical twin instrument). As a result we have made a number of tweaks and enhancements to the software ready for our encounter with comet 67P/CG. After the passive checkout we know that we’re in good shape, so the next step is to upload and apply the software patches. The new software was tested both on the Flight Spare and on an instrument/processor simulator developed by the institute.

Since memory patching is something that has to be done carefully, this is done in an interactive session. Unlike our passive checkout, where everything ran entirely automatically, this time we’ll wait to see if the patch has uploaded successfully before applying it. Given the one-way-light-time (the time it takes a signal to reach the spacecraft) of over 35 minutes, a certain amount of thumb twiddling is involved – but it’s worth it for peace of mind and the safety of the instrument.

MIDAS Flight software testing

With the patch finished, we have a couple of days to wait until our next “on time”. Then we’ll be running our first real scan since entering hibernation!

Waking MIDAS

Please note: this article appeared first, in abridged form, on the ESA Rosetta Blog here

After nearly 1000 days in hibernation, Rosetta was successfully woken up and recommissioned; the spacecraft is healthy and ready to get down to science at comet 67P. But of course it can’t do that without the instruments! In March and April they also go through a re-commissioning exercise. Basically each instruments gets switched on and put through a series of tests.

Rosetta is still so far from the Sun, that even its enormous solar panels can’t generate enough power to switch on everything at once, so each instrument is assigned one or more “slots” to run these tests. MIDAS will first get switched ON early in the morning on 27th March. Rosetta will still be over 35 “light minutes” (the time it takes light, or radio signals, to reach the spacecraft) from the Earth. So this is an entirely pre-programmed sequence of events called a “passive checkout”. We have three hours to check that all of our subsystems are behaving as expected. Although we don’t do any real atomic force microscope (AFM) scanning, we run all of our mechanisms and check how they survived the cold months of hibernation.

The sequence of events looks like this:

  1. Switch on: first things first! When MIDAS powers up it goes into a special mode in which we can perform memory patching and other engineering operations. The first real command to MIDAS loads the on-board software into memory and puts the instrument into “standby” mode. Now we’re ready for business!
  2. Electrical test: different sub-systems on MIDAS can be switched on and off. So the first test we do is to switch each one on for a minute, and then off again. The instrument sends regular telemetry (diagnostic data) including the electrical current, so we have several measurements during this time to compare with the expected values.

    MIDAS funnel and shutter
    MIDAS funnel and shutter
  3. Shutter test: dust grains enter MIDAS through a funnel poking through the “front” wall of the spacecraft. To control how much dust enters, we have a shutter, much like a camera. This shutter is a cylinder with a hole drilled in it to let the dust through, and it opens and closes by rotating the cylinder. The shutter was left open during the hibernation, so during this test we will close, open and close it again.
  4. Sample handling test: apart from the microscope itself, there are 3 main mechanisms on MIDAS. We test each of these by moving them to their limits and back:
    1. the sample wheel can be rotated to position a new target for exposure or imaging,
    2. the sample wheel can be moved to position it in front of a given cantilever (sensor), and
    3. the entire microscope can be moved towards and away from the sample wheel.
  5. Cantilever resonance test: the heart of an AFM is a “cantilever” – a rectangular strip of silicon clamped at one end. MIDAS has 16 of these, each with a unique resonant frequency – this is the rate at which the free end would oscillate if you let it (kind of like holding a ruler over a desk and “twanging” the other end!). We measure this frequency by vibrating the cantilever and looking for the point at which the oscillation is largest.

    MIDAS cantilever array
    MIDAS cantilever array
  6. Scanner test: the AFM cantilevers are mounted on an XYZ scanner – this allows us to move the sharp tip (the bit that touches the sample and makes our images) in three dimensions. To test this scanning mechanism we make a small (32×32 pixel) image, but without touching the sample. This lets us check that the scanner moves properly in all directions, without risking damage to our precious tips.
  7. Switch off: needs no explanation!

We performed an almost-identical test just before hibernation entry, so this is a good check that everything is working as expected. If everything goes well, the next step is to upload a new version of our on-board software – then we can take some real microscopic images!